All posts by Admin

iRobot Scooba 230 In-Depth Review

The iRobot Scooba is a mopping robot. I’ve been curious about the iRobot Scooba line since it was first introduced. But they tended to get bad reviews on Amazon. Of course, if you go to that Amazon link, the top three reviews are happy ones, but if you look at some of the ones on the side, there are reviews that’ll make a person want to avoid the Scoobas, and they worked on me. So this year iRobot introduced the Scooba 230, which is a smaller version of the old ones. The smaller size was a definite attraction for me, considering that the robot can fit behind your typical toilet.

So how well does this new robot work? Let’s take a look.

As mentioned above, the Scoobas are robot mops. Like other iRobot cleaners, they have a multi-stage cleaning system. So they lay down water, scrub it, and then use a specially designed squeegee with a vacuum to suck the water back up. iRobot makes some special soaps for the Scooba. For example, there is a “Clorox Scooba Cleaning Solution” and a “Natural Enzyme Formula.” (The 230 can’t use the Clorox solution.)

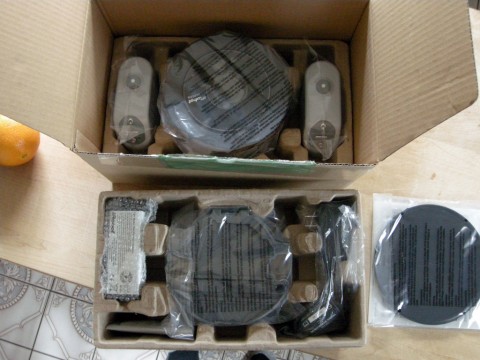
Scooba 230 Box Contents

Here’s what comes in the box:

  • iRobot Scooba 230 robot
  • Rechargeable battery for the robot
  • Charger
  • 2 Virtual Walls
  • 3 Extra bottoms
  • Printed product manual (16 pages)
  • Storage base (not a dock)
  • 4 Packets of the Natural Enzyme Formula cleaning solution

Here’s what is missing: 4 D cell batteries for the Virtual Walls. The Virtual Walls take 2 batteries each. I really prefer it when manufacturers include batteries, so I find this disappointing.

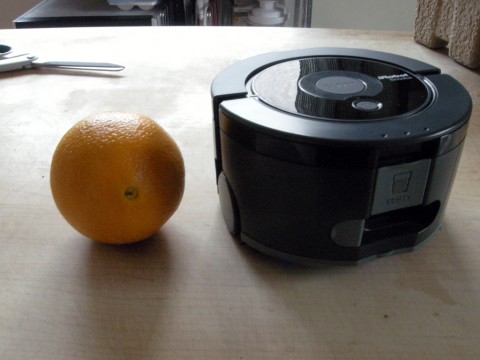
Scooba 230 with an orange for scale

Here is the robot itself next to a navel orange. As you can see, the Scooba 230 is pretty small. It is 3.5 inches tall and 6.5 inches wide. The engineers at iRobot have packed a lot of things into this little package. There is a port for filling the robot, a port for emptying, a recessed carrying handle, three cliff sensors, a wall-following sensor on the right side, a charging port, indicator lights and buttons. On top is a power and Clean button. Like the Roombas and older Scoobas, the Scooba 230 has a bumper on the front so that it knows when it runs into things.

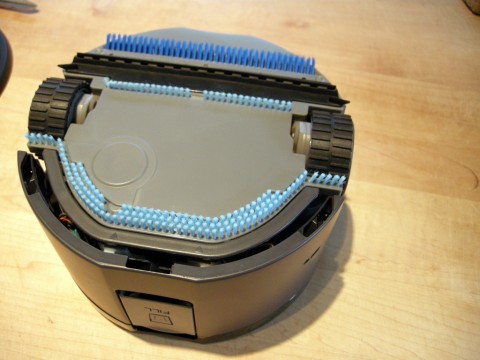
Scooba bottom showing brushes and squeegee

The bottom has wheels, brushes, and the squeegee for picking up the water while it works. The wheels are easy to pull off for cleaning. The light grey part of the undercarriage there is removable, so when the brushes and squeegee wear down, you can replace it. As mentioned above, the robot ships with 3 replacement bottom plates. You can also see the cliff sensors there on the bottom of the bumper. They’re recessed.

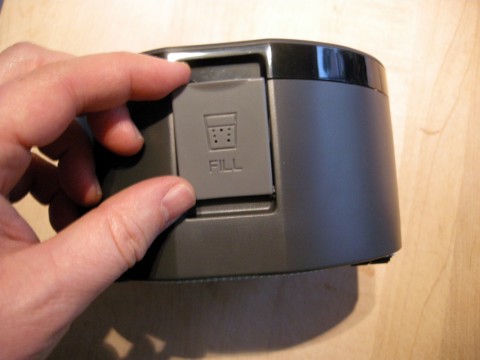
Here is the door for filling the robot with water. This is kind of in an awkward place. It’s not a good idea to get the robot totally wet, so popping it under a running faucet made me kind of nervous. I ended up filling a measuring cup with warm water, and then filling the robot that way. When filling the robot (or emptying it, for that matter) both the fill port and the empty port need to be open, so you can’t put the robot down on a flat surface and fill it.

One piece of good news is that the cleaning solution isn’t stinky. Sometimes cleaners can smell nasty or smell like obnoxious air freshener. The Natural Enzyme Formula has a rather mild, pleasant cleaner smell.

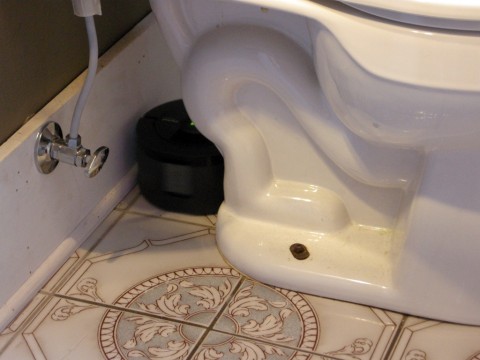
Scooba 230 in action - behind toilet

And here it is in action. (Sorry about the camera shake on the film. I’m working to get some better equipment for making my movies. It’s actually pretty hard to make good product films.) We were pretty excited about the job the Scooba did on the bathroom. It got behind the toilet, which is a pain to clean manually. A person has to get down on their hands and knees to clean back there, so the Scooba 230 gets major points for this trick.

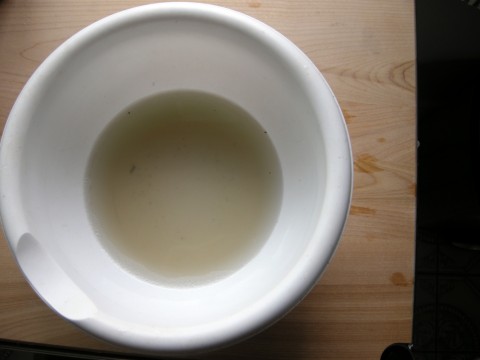
Dirty water from emptying the Scooba

Here is an example of what the dirty water from our Scooba looked like after cleaning one of our rooms. This is what it looked like after every time it cleaned a room. I felt kind of mixed emotions about this result. On one hand, you can tell that there is some dirt in there, and that’s definitely some dirt and grime that is no longer on your floor, which is a good thing. At the same time, it doesn’t really seem like as much as it should.

Scooba has hair problems

Sadly, we have a lot more bad news to relate about this robot. Our Scooba had a lot of problems. For one thing, it left a lot of water on our floor. This is tile, so maybe it would do a better job on totally flat surfaces, but it seemed to leave a lot of water. Also, you have to sweep up before you use the Scooba. The Scooba will not pick up larger debris or hairs. Instead it kind of drags hairs around and leaves them stuck to the floor. Also, the Scooba’s size turns out to be a disadvantage when navigating a room. Both our kitchen and bathroom had a place where the Scooba would get stuck – the heating vent.

The Scooba also had a lot of trouble with the Virtual Walls. The Scooba would approach the wall and either bounce off while still several feet away, or it would get kind of close and then get kind of “stuck” where it would turn again and again in a tight spot. I finally stopped using the Virtual Walls, which was kind of irksome, considering how useful they are when you’re using a robot to clean your floor.

More problems: The battery runs out from cleaning one room with the Scooba, and takes a long time to charge. I didn’t test it, but ours takes at least five hours to charge. So really, you clean one room and then have to charge the robot overnight.

Scooba leaves streaks

Our Scooba left streaks, and although it seemed to do a good job with the bathroom, it didn’t do a great job of cleaning the kitchen floor. Basically it left the entire kitchen floor with a kind of waxy, sticky feeling, and then to make matters worse, the robot stopped working.

After it left the floor feeling sticky, I decided that I should give it another go with just water in the hopes that it would clean up more. So after waiting for the robot to charge up again, I refilled the robot and ran it a second time. Forty minutes later, I returned to find that although the robot had run all over the place, it hadn’t been dispensing water. So it hadn’t cleaned anything. Sadly, the battery was dead. So I charged the battery overnight, and then turned on the Scooba and ran out the door to go to work. Unfortunately, I left in such a rush that I didn’t notice that the Scooba never started moving. So when I can home from work, I found the robot sitting in the exact same place I left it, in the middle of a puddle.

Since the Scooba left us with a sticky, gross floor, I broke down at this point and mopped our kitchen by hand. This is not what a person wants to be doing on a Wednesday night after having spent three hundred clams on a robot mop. It could be my imagination, but while I was mopping the floor myself, it seemed to take quite a bit of mopping to make our floor stop feeling sticky. I had to go over each area several times. I don’t know if that was because of the cleaning solution, or if we had something really sticky that the Scooba just spread around for us.

Over the next couple of days I found that sometimes the wheels would start working again, but the water dispensing part wouldn’t work. Then later, it would all stop working. There doesn’t seem to be a rhyme or reason. The manual doesn’t have anything useful to say about what to do if your Scooba stops working. I tried some different ways of turning it on with the hopes that I could “reset” it. Also, I tried pulling the battery to see if that would make a difference. Neither strategy seemed to help. I have yet to call iRobot’s customer service about it, but will report back here when I do. In the meantime, I have to give the iRobot Scooba 230 a failing grade. I plan to send ours back for a refund.

Just in case you’re still curious, here’s a link to the iRobot official page for the Scooba 230. Or buy iRobot Scooba 230 + Essentials Kit Robotic Vacuum from Amazon.

Here is a our page with further information about iRobot’s products that aren’t robot vacuum cleaners.
iRobot Roomba 780 vs Roomba 535 Showdown!

Continuing our in-depth coverage of the iRobot Roomba 780 robot vacuum cleaner, I would be remiss in not comparing a Roomba 700 series to a 500 series. In particular, we took both robots and had them vacuum the same room, one after the other, the same way we did in our Mint Cleaner vs Roomba 700 Series comparison. I should also note that there is already some information comparing the 500 Series and 700 Series Roombas, here in our 780 review.

iRobot Roomba 500 Series vs 700 Series

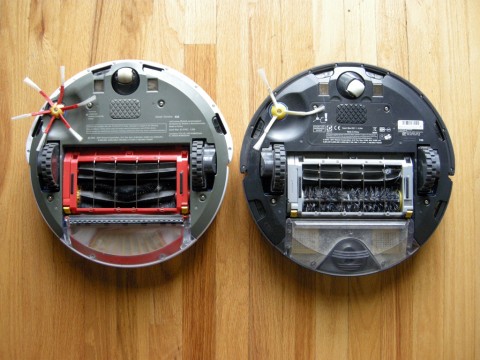
So let’s get down to brass tacks and talk about the differences between the two robots. On the left is a Roomba 535. One of the biggest differences is that all the 700 Series robots have on-board scheduling. As mentioned elsewhere, the 760, 770, and 780 have a new cleaning head designed to pick up finer particles, AreoVac Series 2 dust bins which have better suction, and a 50% longer battery life. In the 770 and 780 only, there is a new improved Dirt Detect feature and a bin full indicator light on the top of the robot. The 780 has a touchpad control instead of buttons on the top.

As you can see in the photo above, the 780 has two more cliff sensors behind the drive wheels, for a total of six. This enables the robot to back up, which is something that the 780 does and the 535 doesn’t do. In fact, I’m pretty sure that this is entirely new to the 700 Series robot vacuums. When the Dirt Detect kicks in, they do a spot clean, and unlike earlier Roombas, which circled around a dirty spot, the 700 series actually runs back and forth over the spot.

Another new feature that is easy to overlook is that the battery has a door. On the 535, you have to take the whole bottom off of the vacuum to get to the battery. On the 780, there is an easy to open port. You’ll also notice that the side brushes are different. The 535 has six arms while the 780 has three. I did not notice any real difference in performance between these two brushes.

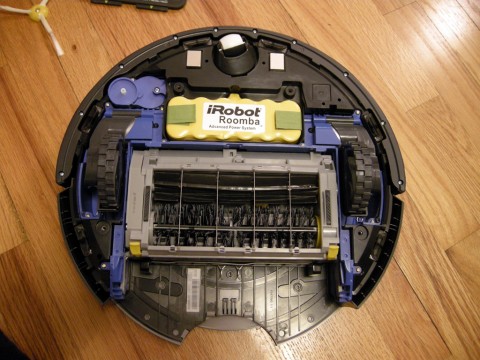
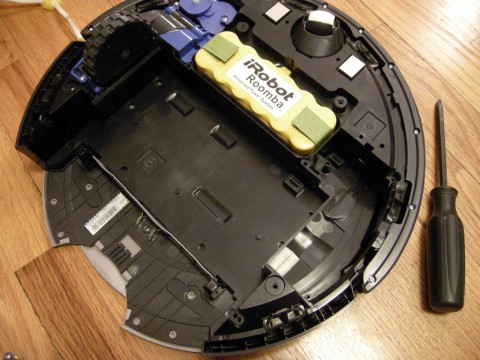
Roombas side by side with the bottom off

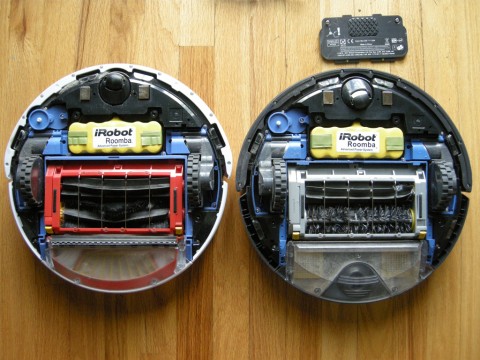
Here they are with the bottoms taken off. Again the 535 is on the left. As mentioned in the 780 review, the cleaning head has been redesigned. It has been my experience so far that it collects less hair around the beater bearings. The cleaning head in past Roombas has been something of a magnet for controversy because it has a gear box on one side which is designed in such a way that it’s not completely sealed. So some of them may slowly collect fine debris inside, and as such eventually it may have problems or need to be replaced. The jury is still out on whether or not this will continue to be a problem with the 700 Series, but a careful look at it reveals that some changes have been made to the design. Only time will tell whether or not this will make a difference.

The battery, side brush component, wheels, and even the cleaning head all appear to be interchangeable between the two robots. The caster wheels appear to be identical. I was able to pop all the modules all out of one robot, and then insert them into the other. I wasn’t brave enough to turn them on with the parts exchanged, but I did note that the side brush unit has identical part numbers on the circuit board. The wheel units appear to be identical with the exception that the newer wheels lack a hole that is in the older ones, and are labeled L and R.

The batteries for these two Roombas appear to be the same but have different part numbers. On the 500 Series, the battery is part number UNH071113 0740. On the 780, the battery is labeled “Model 3000”. Both are APS (Advanced Power System). Both are Ni-MH. Both appear to be made of the same number of cells. The Model 3000 is listed on iRobot’s site as having 3000 milliampere-hour (mAh). I’ve done a little research on the other battery and can only assume that it is the same.

Roomba dust bin comparison AeroVac Series 2

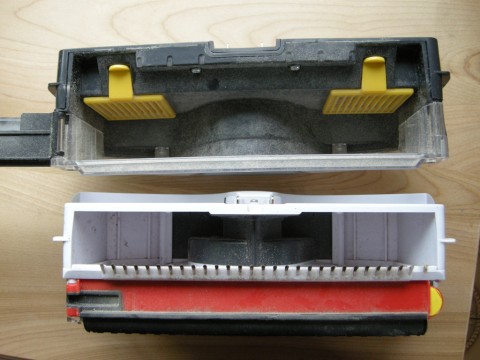
As mentioned above, the 700 Series Roombas have a new suction and bin component, called “AeroVac Series 2.” This new one is the top bin pictured here. The new bins are one single chamber with two HEPA filters on the top. When you really look at them with an eye towards comparison, it’s a little bit hard to tell which bin can hold more, because the older bins have an extra compartment on the bottom. Of course, this is the area that the smaller particles end up in, so it doesn’t really fill up as much, at least in my experience. If you consider them side by side, though, it does look like the newer one will hold more debris. The newer bin is easier to clean. You just knock it out, and then pull out the two filters and knock them out. With the older bins, you have to knock out the top, then open the bottom and knock it out, and then pull the filter out of the bottom and knock that out. The filter in the older ones is kind of fiddly with getting it put back in. It’s not a huge difference, but it’s noticeable.

When running the robots, they both seem equally loud. The Roomba 780 sounds a little different on carpet, like the beaters are working harder or something. It also appeared to me, just from watching the two robot vacuum cleaners in action, that the 780 did a better job of seeing objects in its path and slowing down before bumping into them. In other words, the 535 plowed into more furniture at full speed than the 780 did. Something interesting did happen when we first ran the 780 on one of our carpeted rooms, though. It looked to us like the carpet was cleaner than we could remember having seen it in a long time. We decided that further testing was required.

Cords and fringe to get the Roombas stuck

So we set up our living room as a test area. This included scattering some extra dirt and lint around to give the robots a good test. We ran the 500 series Roomba first, and then followed it up with the 700 series robot. The we did the same thing but backwards in another room in the house. In the living room test, we also set up a small area with some cords to see if either robot would get stuck, or if they would run off with any of the cords. The living room area is about 150 square feet and has a large area rug in the center. It also has an entertainment center, a dining table, a cabinet, a couch, and an easy chair. It needs to be noted that both robots were run with new batteries, but the 535 has an old filter, even though I spent some time cleaning it out before this test. So the 500 Series has a little handicap.

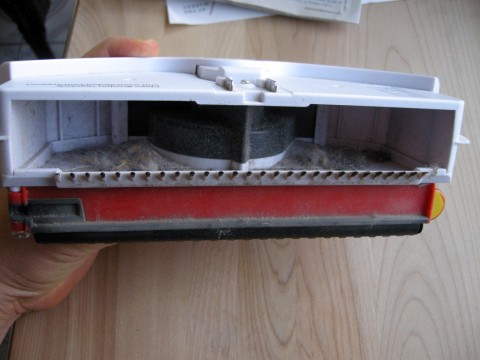
Dust bun from the 500 Series - top area

Bottom of the 500 Series Dust Bin

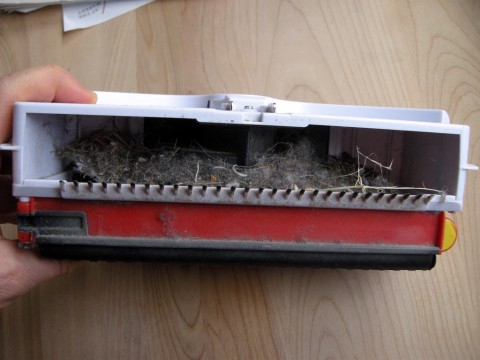
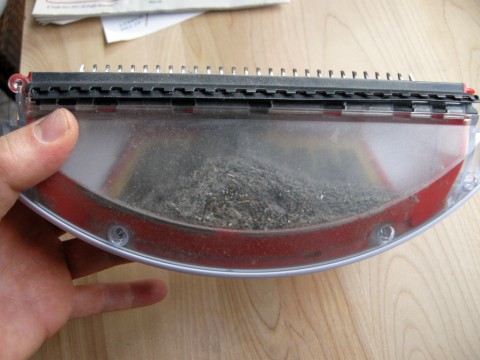
And here are the results from the 535 cleaning the living room. It took an hour to complete the room, and did a decent job of cleaning. There were a few visible fuzzies left in the carpet that the cleaning head didn’t seem to be able to pull out of the pile. The Dirt Detect light came on when it went over some of the dirty areas we had set up for the test. The 535 got kind of tangled in the cable trap, but made it out OK, and didn’t pull anything out after it. (I do have to say that this robot does have a reputation for getting tangled up in cords and once somehow managed to topple a floor lamp.) So as you can see, after cleaning the room, the dust bin was maybe a third full in the top, and there was some fine dust in the bottom chamber of the bin.

Then we ran the Roomba 780 in the same room, right after we ran the 535. The 780 finished the room in 45 minutes, which was 15 minutes faster than the other robot vaccum. Also, I noticed that the 780, when doing the rug, kept finding dirty spots. So the Dirt Detect light would go on, and the Roomba would go over the same spot a couple of times. I counted this four different times, and thought that it was pretty interesting, considering that the 535 hadn’t found any Dirt Detect areas on the rug. Also, as noted above, the 780 Roomba sounded like it was really doing more with the beaters on the rug. So how did it do?

Full 700 Series Roomba Dust Bin

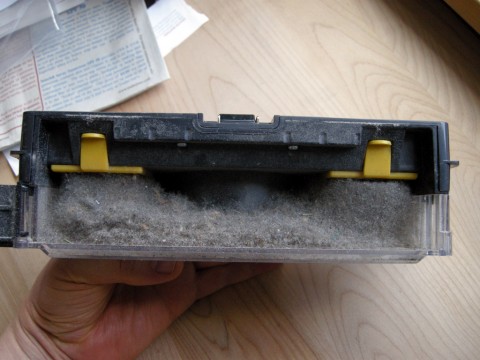
Wow! I was really shocked to find that the 780’s dust bin was completely full! Check this out. We ran this robot after the 535 had cleaned the floor, and there was actually more debris in the dust bin than was in the 535.

We discussed the results and thought that maybe our carpet is an endless supply of lint and dirt. So of course the 780 would come up with some more dirt. But that doesn’t explain why the 780 would come up with more dirt. So we ran the 535 again.

Last 500 Series Cleaning Test Shot

And it basically came up with lint. Not satisfied, we ran the same test in a another carpeted room, except that in that room we ran the 780 first and then followed it up with the 535. I’m not going to post the photos from that one, but again, we found that the 780 picked up more debris, although the 535 found plenty too, it wasn’t as dramatic a difference.

So there you have it. It looks like the iRobot Roomba 780 is a real upgrade from a 500 Series robot vacuum cleaner. So if you’re trying to decide if you should spend the extra money on a newer Roomba, the answer is: Yes.

Get the iRobot Roomba 780 Vacuum Cleaning Robot at Amazon

More Information

Roomba 700 Series at Engadget
Roomba 700 Series on Gizmodo
Roomba 780 review at Robot Buying Guide

iRobot Roomba 780 – An In-Depth Review

Recently, iRobot announced a new series of its consumer home vacuuming robots, the Roomba 700 Series. Along with this new series, they announced some new technologies. The flagship robot in the 700 Series is currently the Roomba 780. There are also two other 700 Series robots, the 760 and the 770. They come with some different features and accessories. The biggest difference between the three is probably that the 780 has a touchpad interface and comes with Virtual Lighthouses instead of Virtual Walls. For more details, I break down the 700 Series feature and accessory differences here. Don’t miss my two other 780 reviews: The first contracting and comparing it to a Mint Robot Cleaner. The second comparing it to a 500 Series Roomba.

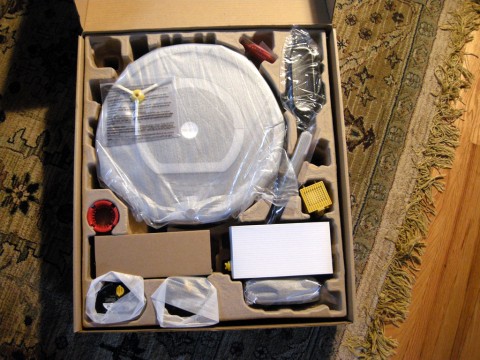
Here’s what you see when you open the box. So it comes with a self-charging dock, the battery charger, battery, extra filters, extra brushes, various brush cleaning tools, a remote control, and two virtual lighthouses. Besides the battery for the robot itself, iRobot does not include any other batteries. So you’ll need to get two double-A batteries for the remote, and also four C cell batteries for the lighthouses (each lighthouse needs 2 batteries). I’m one of those people who likes it when manufacturers care enough to include some alkaline batteries when they’re needed, so think it’s kind of lame that iRobot doesn’t include batteries for the accessories.

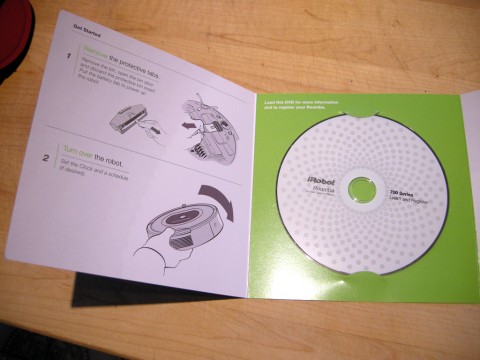
Quick Start Guide and DVD

iRobot includes a quick start guide and a DVD. The quick start guide has four easy steps to get you vacuuming right away. I like quick start guides, and was glad iRobot included this. Basically, you take the robot, pull a tab out of the battery area, pull a piece of cardboard out of the dust bin, set the time on the Roomba, set up the charging home base, and then charge it up. iRobot is definitely into having you charge the robot. The DVD talks about it a lot.

Speaking of the DVD, it has a bunch of movies about how to use the robot. The DVD is somewhat interactive. There is a section of instructional movies about cleaning with the Roomba. There is another area where the parts of the Roomba are identified. Besides the movies, there are applications for the PC and Mac on the DVD. These organize the documents available for the robot and include links to iRobot’s Customer Care area and where you can download User Manuals. Also included are the User Guide Manual (which covers the 700 series as one), Registration Data, Warranty Card, Important Safety Instructions, and a few other documents of interest. I’ve gotta say that I’m sure whether or not I like the fact that the User Manual does not come in printed format with the robot vacuum cleaner. On one hand, they’re saving trees. On the other hand, it’s inconvenient having to go to a computer and open up the manual any time you have a question. The manual is short and sweet, weighing in at 9 pages, including cover.

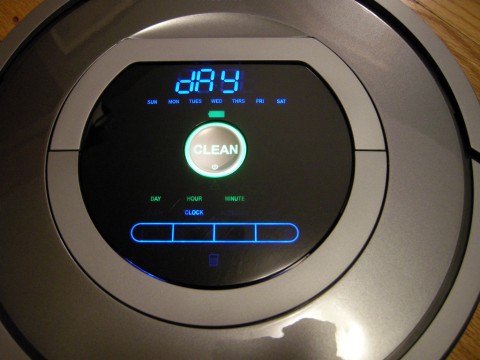
Setting the time and scheduling

Once you set up the charging base and put the robot on it, you’ll want to set the time, and also look at how to schedule the Roomba using the onboard scheduler. If you can set the time on an alarm clock, you’ll be able to set the time on the 780. It is as easy as pie. You basically turn the robot on, press clock, then use the minute, hour, and day buttons to set the time. Then press OK to finish. Scheduling works pretty much the same way, except you press Schedule to start. You can schedule one time a day each day of the week.

Bottom of the  Roomba with the cover off

One thing that’s great about Roombas is the technology. All of the major parts of a Roomba are modular, and can be replaced very easily. So the wheels come out as units, as does the side brush, the cleaning head, the roller, and the dust bin. Here is the 780 with the bottom taken off. You can see the pieces in purple which can be taken out.

Roombas have modular parts

All this with a single phillips screwdriver. I think this is a really great feature! Of course, you wouldn’t do this unless you needed to fix something on your robot.

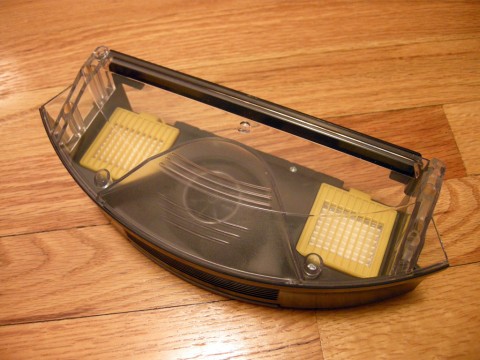
Here is one of the new pieces of technology in the 700 Series Roombas, the AeroVac Series 2 Bin. When compared to the dust bin from a 500 Series Roomba, you can see that the bin is pretty different. The filters are very different, there is more space for debris inside of the bin, and the bin itself is a lot easier to empty out. iRobot says that these new bins have more suction and that the debris gets distributed in the bin more evenly. The 700 Series Roombas all come with HEPA filters. HEPA filters are designed to capture very small particles so that common allergens don’t get thrown into the air by the vacuum. So they’re good filters for people with allergies.

To empty the bin, you open a wide gate that closes off the bottom half of the bin, and then shake it out over a trash can. Then you need to knock out the two filters. These are colored yellow and have handy pull-tabs so that they’re easy to get out. Once removed, you knock those out over your trash can, and put them back in. The process is very easy.

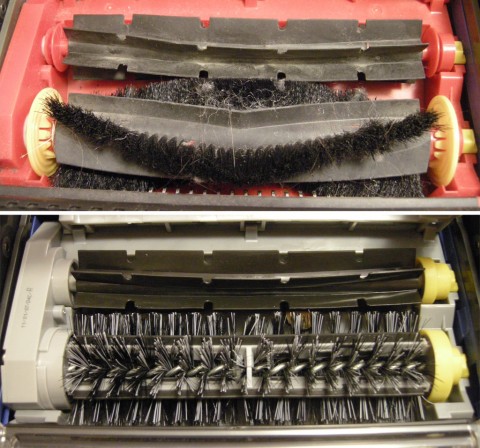
Difference between 500 and 700 Series Brushes

Besides the bin, iRobot has made some other changes under the hood, particularly with the cleaning head. Here are the brushes from a 500 Series Roomba (top) compared to the 700 Series (bottom). One of the things a Roomba owner learns is that the brushes have to be maintained, and one of the worst things about that is hair gets wrapped around many of the different parts of the brushes. One of the more obvious differences here is that the bearings on the 700 series are designed to not pick up as much hair. For one thing, on the left, the bearings on the 700 Series actually slip into something like a cowling, which keeps hair from wrapping around that end. On the 500 Series, these bearings are exposed and get all tangled up with hairs. Not as obvious, but also different, the bearings on the right side have been redesigned to make it so that there aren’t grooves for the hair to wrap themselves up in. Besides these differences, iRobot claims that the 700 Series cleaning head is designed to pick up smaller particles better.

So what else is different? The 700 series comes with a new improved Dirt Detect feature but in the 770 and 780 only. So when the robot detects an especially dirty area, it will spend some time concentrating on that area. The battery life is claimed to be 50% longer. There is a bin full indicator light (again only in the 770 and 780). All come with remotes. The 780 comes with a touchpad control.

The touchpad control is very nice. I don’t really see what the big deal is, though. I mean, with the other two 700 Series the controls are basically the same but they have buttons instead of a slick interface. I guess maybe also the touch face makes it so you can just wipe off the top of the robot to clean it. The bin indicator light sounds like a great idea, but in practice maybe not so much. I found that after a good vacuuming session, the bin indicator sensors get dirty, and so the light won’t go off when you empty the bin. You end up having to empty the bin and then wipe the bin full sensors off. This makes me wonder if the sensors are really accurate. Maybe this is a good idea that is waiting for a better implementation.

I like the fact that a remote is included with all of the 700 Series Roombas, although I do have to say that it has limited functionality. You can use the remote to start the robot, steer it, spot clean, and dock. So it’s more of a fun thing that is handy every once in a while, but isn’t something that everybody will really need.

As advertised, the Roomba 780 does not eat the tassels on your oriental rug. Also, it can figure out if it is chewing on a power cord and spit it back out, which is pretty cool! It makes a funny noise when it does that. Mostly, though, when it comes to cords and cables, you’re going to want to move them out of the way or tuck them away as much as possible. The unfortunate fact of the matter is that there is some room prep you need to do before running your robot vacuum, but it’s mostly prep you would have to do with a normal vacuum.

So how does it clean? Great! It does an absolutely great job of cleaning floors, carpeting, and rugs. It picks up little things that my 500 Series Roomba doesn’t get, and seems especially better at pulling little fuzzies out of our area rug. We tested the Roomba 780 with a Mint to see if one cleaned better than the other. See here for the full article: Roomba 780 vs Mint Cleaner. We found that they were pretty evenly stacked up, except that the Mint doesn’t do carpets. The Roomba is the winner for people with carpets, and also has more accessories and fun technology.

Get the iRobot Roomba 780 Vacuum Cleaning Robot at Amazon