Tag Archives: Cleaning

Evolution Robots Announces New Mint Plus Model

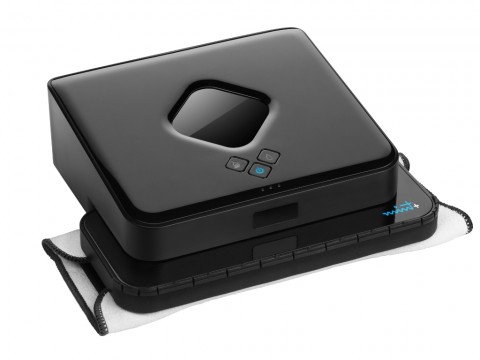
Mint Plus Model 5200 with cloth

Today Evolution Robotics announced the newest model of the Mint Cleaner, the Mint Plus. The Mint Plus (which will be going by the model number 5200) has several improvements over the previous model. It charges faster, has a 25% longer battery life and thus can sweep larger areas. Also new is the “Pro-Clean System”, which is an improved mopping system with a reservoir pad.

Later note: We’ve got our hands on a Mint Plus and published a comprehensive review, here.

They’ve also improved the NorthStar module, which is what the robot uses to navigate as it seeps and mops your floor. According to the manufacturer, the NorthStar2 module is more efficient, and helps the Mint sweeper cover more ground faster.

The new Mint Plus charges in two hours, and can go for four hours. It has a Pause/Resume feature for pausing the Mint mid-clean. The Mint Plus also features a “Quick Clean Mode” where it does the back-and-forth floor cleaning but then skips the perimeter.
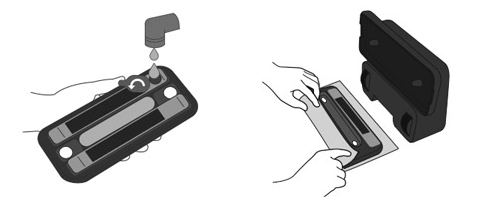
Mint Plus Pro Clean reservoir illustration

Details about the New Cleaning Pad Reservoir

The Mint sweeper comes with a cleaning pad that you attach a Swiffer or washable microfiber cloth to. Evolution has modified the pad so that it has a reservoir that you fill with water (and a “mild cleaner” if you prefer). To use this feature, you remove the cleaning pad from the robot, fill the reservoir at the sink, add any cleaning solution you desire, close the reservoir, and you’re ready to go (after attaching the cleaning cloth, of course). We’re really looking forward to trying this out. In our experiments with using the regular Mint robot for mopping, the cleaning cloth would dry out before the robot was done mopping. This is a great idea. More info here on Mint’s site.

Improved NorthStar
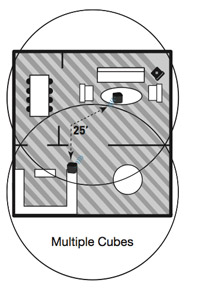
Looks like the NorthStar2 module helps the new Mint Plus navigate larger areas, and also they have changed the way that the robots clean multiple rooms. With the older Mint cleaner (Model 4200), the second NorthStar module would simply keep the Mint from going into the next room by itself. You would have to move the Mint robot there yourself. With the new NorthStar2, they’ve changed the way the cleaner interacts with the NorthStar cubes such that it will stay in one room until it finishes, and then will go into the next room (with a second NorthStar module). Unfortunately, the 4200 Mint will not be able to use this new navigation scheme.

With the new NorthStar2, you can also pause and resume cleaning. So if you want to change the cleaning pad, or replenish the Mint’s reservoir, you can pause the Mint by pressing any button on the robot, and then when you’re done, the Mint will resume cleaning without needing to cover floor area that it’s already done.

More information on Mint’s site, here.

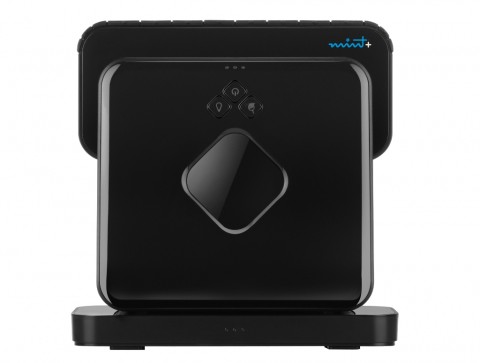
Mint Plus with Cradle - model 5200C

Mint Plus with Cradle

Mint’s site also mentions that there will be a Mint Plus with Cradle (model 5200C) coming. That sounds like a great idea. Watch our site for more information about this, and a review as soon as we can get our hands on one of these babies.

The Mint Plus is currently available at Amazon dot com – charging cradle here.

Further Reading about the Mint 4200 Model

See our in-depth review on the Mint Cleaner here. Check here for a comparison of Mint and Roomba. And, 12 reasons why the Mint is better than the Scooba 230.
How to Fix Your 500 Series Cleaning Head Module

This article includes step-by-step instructions with photos for how to fix a problem with the iRobot Roomba Cleaning Head Module. This fix is a repair for modules when the brushes have stopped moving due to the build up of hair and debris in the gear box. If you’re handy at all, this should be a pretty easy fix. Obviously, this won’t necessarily resolve the problem in all cases. Be careful and do this at your own risk.

The Cleaning Head Module on the 500 Series iRobot Roombas are a sore spot for many robot owners. The problem being errors and maintenance problems caused by the slow accumulation of hair and debris in the gearbox of the Cleaning Head Module. The problem affects basically all the 500 and 600 series Roombas. So this means the 610 Professional, the 570, 572, 560, 562, 532, 530 and 510. As you can see, this includes the Pet Series Robot vacuum cleaners. I’m pretty sure that the 400 Series, 4000 Series, and earlier are also affected. As mentioned in my 780 review, the design of the Cleaning Head Module on the 700 Series Roombas is clearly different, but only time will tell if it has the same problems.

What happens is that the gear box of the Cleaning Head Module collects hair and debris over time and gets jammed up so that the brushes don’t turn while the robot vacuum is cleaning. As a result the ability of the Roomba to clean properly is affected, and the robot may also give errors or refuse to work. While it is possible to order a Roomba 500 600 700 Series Cleaning Head Replacement, you might be able to solve your problem by following the instructions, below.

Roomba Gearbox Repair

First remove the dust bin. Then remove the sidebrush by unscrewing the screw in its center and then pulling the side brush off. Next unscrew the four screws that hold the bottom panel on. They are the screws with the little triangle arrows next to them. These screws don’t come all the way out. You just need to unscrew them until they are loose and the panel can lift off.

Removing the Cleaning Module

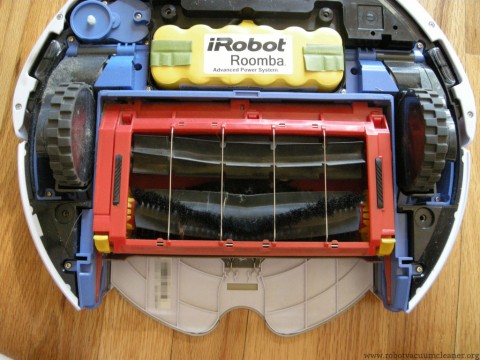
With the bottom panel off, you can see the Cleaning Head Module. There are four more screws holding this on. There are two at the top of the module, next to the corners of the APS battery. The other two screws are near the bottom on either side of the module. The Cleaning Head Module looks kind of like a rectangular box with two arms coming off of it. These screws, like screws that hold the panel on, don’t screw out all the way, so you only have to screw them out enough until you can lift the module out of the body of the robot.

The Cleaning Head Module

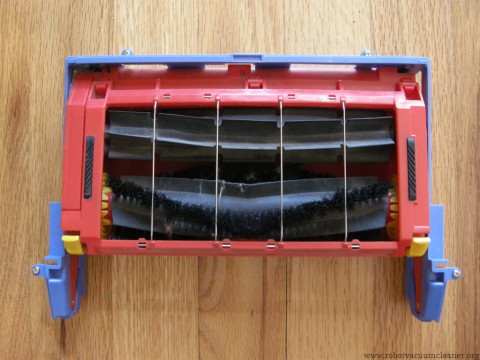
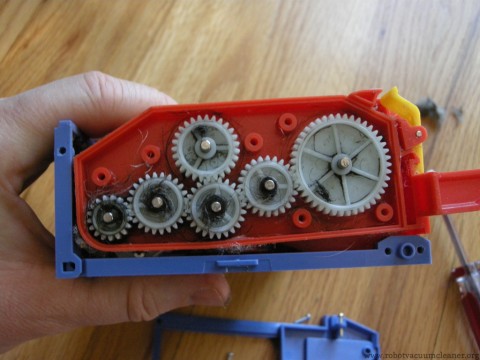
Here is the Cleaning Head Module out of the Roomba. The gearbox on this module is on the left side here, and is in the red part of the module. So you see there where the brushes go into the left side? That’s where the gear box is. The gearbox drives the brushes. That’s also where the hair and debris gets into the gearbox. Getting into the gearbox is a little more work. Here’s how you can do it.

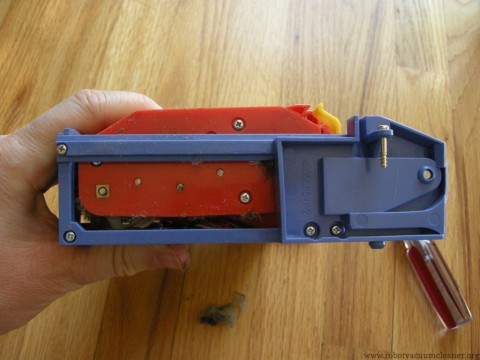
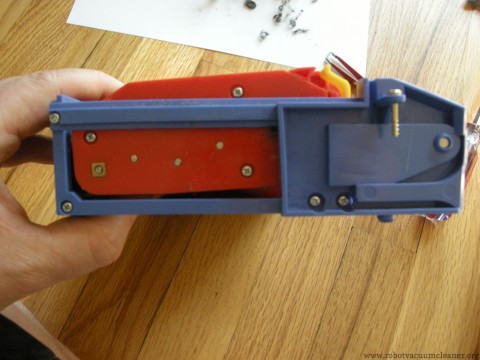
The side of the module with the gearbox

Pick up the module so that it’s on one end with the gearbox end pointing up towards you. Here you can see that there are four more screws which are holding the blue side of the module on. We need to take the side off so that we can get to the red part. So unscrew these four screws and lay them in one place.

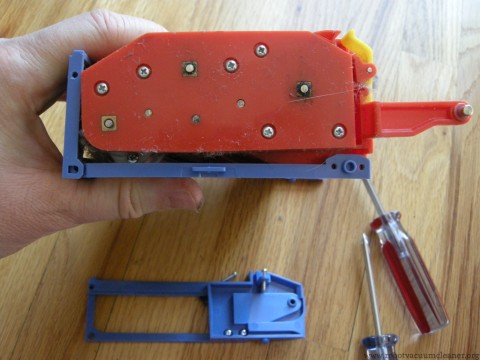
The cleaning head gearbox side exposed

Here’s the cover on the gearbox. As you can see, we have six more screws that need to be removed and then we can take the side off. Remove and place the screws in a spot away from the other screws you pulled out previously, so that they don’t get mixed up.

Hair and debris in the gearbox

And here’s what might be in your Roomba’s Cleaning Head gearbox. My Roomba was functioning just fine, even with all this hair and debris, but you can see that there is some accumulation and that eventually this might render the module inoperable.

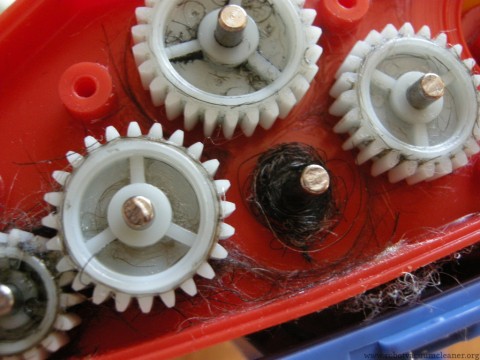
A roll of hair under a gear

While doing this cleaning, I only pulled one gear out at a time so that I wouldn’t lose the proper placement of the gears. I would guess that a person could probably take the gears and place them on a piece of paper with numbers to keep them straight, or find another way of keeping them in order, but I like to keep things simple. So what I would do is remove one gear, pull the hair off of it, and then remove any hair that was under it inside the gearbox.

It bears mentioning that the gearbox also contains a film of lubricant, and depending on your situation, you might be able to get away with just pulling out the hair and leaving most of the lubricant still in the gearbox. Not all kinds of lubricant are safe to use with plastic parts. If you know for a fact that you have a lubricant that is safe to use with plastic, then go ahead and really clean that gearbox out, and then put a little lube back in there. Otherwise, I suggest just doing your best to remove the hair and not wipe the gearbox out. (Note: Your local Radio Shack probably sells a plastic safe gel lubricant which would be appropriate.)

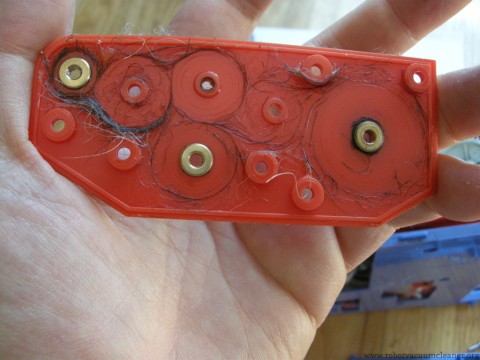
The inside of the gearbox cover

Here’s more area to clean. It’s worth noting that the engineers at iRobot have reinforced the plastic with brass for the holes that need it. I have found instructions online for boring out the insides of the gears in these gearboxes and installing gear bearings, but really, that’s something that a person shouldn’t be doing unless they have access to the proper tools for the job. Obviously, a metal gear train with bearings would be ideal. But nylon, stainless steel and brass have been used to make durable gear trains for a long time and in my humble opinion, the engineers at iRobot have created a suitable consumer-grade gear train. The problem is the holes for the brushes, not the gears themselves.

Put it all back together again

Once you’ve got the hair and fuzz and everything else out of the gearbox, carefully put it all back together again, and reassemble the robot following the instructions the other direction to assemble all the parts.

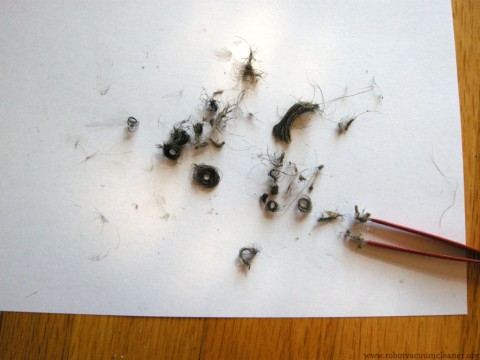
The debris from the gearbox

Here’s what I pulled out of this gearbox. I did this for the sake of demonstration, so if your Roomba’s brushes have stopped moving, I’m betting that you’ll be pulling a lot more than this out of your robotic vacuum.

Get a new iRobot Roomba 780 Vacuum Cleaning Robot on Amazon

iRobot Roomba 440 Giveaway!

Later note: This giveaway is finished and the winner has been notified. Thanks to all of our entrants!

Looking for the newest, best Roomba? Read our in-depth review of the iRobot Roomba 780, or check out how it compares to a Mint, or 500 series Roomba!

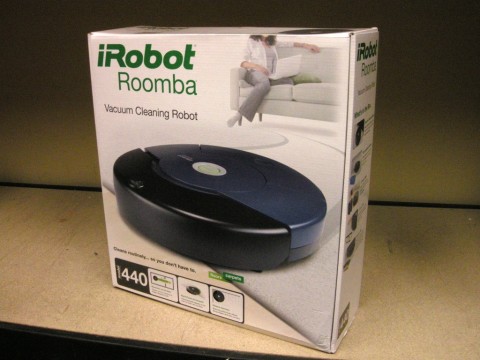
We’re excited to announce our first giveaway. We’re giving away a free iRobot Roomba 440. This robot comes with 2 Virtual Walls and an extra filter. Like Roombas should, the robotic vacuum also comes with a bagless bin, a charger, and a rechargeable battery. This is a new Roomba. Here are some places to check reviews, specs, and prices for this model. (Don’t forget to come back here to sign up! It’s OK – we’ll wait for you.)

440 Reviews on Amazon
iRobot Roomba 400 Series on eBay

This robot has Spot Cleaning function, which is a cleaning function you start manually. Spot Cleaning is for cleaning up a small area quickly. Otherwise this Roomba is kind of no frills. Gets the job done. iRobot says the robot will clean 2 rooms on a charge. Check our Roomba Models page for more details on the various features that the other models have.

iRobot Roomba 440 in box

What is up for grabs: One iRobot Roomba 440, new in box

Who will win: Here’s what you need to do to qualify for this giveaway: Leave a comment below. The winner will be drawn at random. You can only comment once per person, but there’s a twist. If you Tweet about this giveaway it will count as an extra entry, and if you link to this post from Facebook, it will count as an extra entry. To get your extra entries, simply include another comment for each extra one you do.

Click here to Tweet.

Click here to link from Facebook.

When and how the winner will be chosen: The giveaway ends two weeks away at midnight, on Friday, August 5. The winner will be selected randomly using random numbers generated by random.org. Only US and Canada residents, please.

Notification: Winner will be notified by email.